Monday, March 18, 2013

Vegan Green Lentil Patê


The true test of how good a dish really is, in my mind, is how well it's universally liked. If you're inclined to agree with me on this one, then I can guarantee that you will love this recipe for an earthy and savory green lentil patê.

Often when A and I escape from the big city, we find ourselves in Bucks County, PA visiting friends and family. One place I'm always eager to go to is Aunt J and Uncle G's house in the woods. This spot is also known as The Vortex for its time proven ability to suck visitors in for endless hours of music, imbibing, and brain-meltingly good food. Aunt J always puts on a fabulous spread, whether it be her 6 course Midsummer Night's Feast from this past year or her annual New Year's Day brunch. On more than one occasion, she's made this patê and even when it sits side by side other tasties like caviar, cheeses, and patê-of-the-meat-variety it's always been one of the first items that people devour. Vegan patê so good that it gives all other hors d'oeuvres heavyweights a run for their money.


A couple weeks ago, A and I were the hosts for a gathering of the Astoria Whisky Society. I thought it quite apropos to make a batch of this patê to fill our stomachs in preparation for Whisky Smashes. And once again, it did not fail to disappoint. Believe me: it's just that good.


***Note: A couple of ingredients on this list *might* be hard to find if you don't have access to a good whole/organic foods grocery. Aunt J was good enough to provide me her ingredient substitutions, but luckily my local organics shop had everything I needed. So don't sweat it if  umeboshi paste is nowhere in sight.

Umeboshi paste is a common component in Japanese food. It is a paste made out of umeboshi plums. Despite its fruit base, it is not sweet at all but has a strong sour and salty profile. As per Aunt J's recommendation, if you can't find umeboshi you can instead substitute about a tablespoon worth of finely minced cornichons with a dash of vinegar (rice wine or ume vinegar), enough to make a paste.

I was able to find barley miso, but any other variety (red or white miso) will be fine.

Mirin is a sweet rice wine similar to Sake, often used in Japansese cooking. My pantry was out of mirin, but since I made this on a Saturday morning, A and I had an open bottle of champagne. A tablespoon of champagne for mirin was a perfectly acceptable substitute, as would be white wine in a pinch.


Vegan Green Lentil Patê


2/3 cup dried green lentils

1 large bay leaf

2 cups walnuts, whole and unsalted

1 Tbs extra virgin olive oil

3 cups diced onion

1 Tbs minced garlic

1 Tbs mirin

1 Tbs plus 1tsp umeboshi paste

1.5 Tbs barley miso


Pre-heat your oven to 350 degrees.

While the oven is heating, cook your lentils (with the bay leaf) in enough water to cover them by 2 inches. Bring the water to a boil, then lower to a simmer, cover, and cook for about 30-40 minutes.


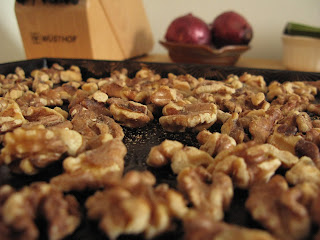
While your lentils are cooking, spread your walnuts out in a single layer on a baking sheet and roast them for about 6-8 minutes. The goal is to get them toasty and maybe about 1 shade darker than they were before.


In a fine-meshed sieve, drain your cooked lentils.

In a large sauté pan, heat the olive oil over medium-high heat. Sauté the onions for about 10 minutes. Add the garlic and cook for about 5 minutes more.


Once the onion and garlic has cooled off a little bit, combine the lentils, walnuts, onion, garlic, mirin, umeboshi, and miso in a food processor. Alternately, you can put everything in a large bowl and process with a stick blender. Blend until you have a fine and uniform paste. You almost certainly won't need any salt. The umeboshi and barley miso are quite salty on their own. But, just in case, taste for seasoning at this stage.

Before serving the patê, I wanted to put it in a sort of molded shape. I took a medium-sized Pyrex ramekin and lightly greased it with olive oil before scooping the patê into it and smoothing out the top. I covered it with a bit of saran wrap and cooled it in the fridge for about a couple hours. When I was ready to serve, I took out the ramekin and inverted it over a plate. The patê came out very easily and made for a nice presentation.

Left-over patê (if you end up with such a thing) could be used in all sorts of delicious applications: spooned into lettuce cups and garnished with scallions or chives, slathered on slices of bread as part of a sandwich. Endless possibilities.

This recipe made about 2 to 2.5 cups worth of patê. Covered and in the fridge, it will keep for 3-5 days.


Saturday, March 9, 2013

Lager-braised Sirloin Stew


Weeks like this past week can really take a lot out of a person.... It's that point in the semester where energy and motivation seem to be at their lowest. A lot to do and not enough time to do it. So when you take student teaching, graduate school, a multi-step teacher application process, and a nagging head cold, chances are you're going to feel pretty depleted by the end of the week.

As I left school yesterday and trudged through the insistent and wet snow that the region's current nor'easter was dumping on us, I could only think of food that was very warm and very slow cooked. I know A is very fond of a good beef stew whether it's a boeuf borguignon or simply stewed with some onions, peas, and carrots. Although I love Julia Child's boeuf recipe and have done it plenty of times, I didn't quite feel up to that on this particular day. But I did keep her recipe in mind as I made my various mental preparations: beef first seared and then slowly cooked for hours with a nice lager beer as the liquid base. For an added comfort factor, I even served the stew over a small bed of egg noodles. It was perfect, and delicious, and I'm going to share the love right here.

***Note: for this recipe I just picked up a couple sirloin steaks, about one pound each. Nothing super fancy. Even if it starts out as not-the-most-tender-piece-of-meat-in-the-world, it's alright! The long and slow cooking process breaks down even the toughest bits so that you're left with little melt-in-your-mouth morsels. I also passed up some pre-cubed stewing beef, just because I like a little more control over exactly how my ingredients go in the dish.


Lager-braised Sirloin Stew

makes 4-6 servings


2 pounds of beef (see note above), cut into 1" cubes

Extra virgin olive oil

One yellow onion, large dice

3 medium carrots, peeled and cut into 1/4" slices

2-3 Tbs all-purpose flour

12 oz good quality lager beer

1 cup - 1.5 cups chicken stock

2 tsp tomato paste

1 tsp dried thyme

8-10 cremini mushrooms, quartered

1 tbs butter

1 cup peas

Salt and pepper, to taste


I always like to start with my mise-en-place and get all of my ingredients peeled, cut, cubed and prepped. Slice the carrots and onions (This one was potent! Never had an onion make my eyes water so badly before!) and set them aside in a bowl so that they'll be ready to go in the pot right away.


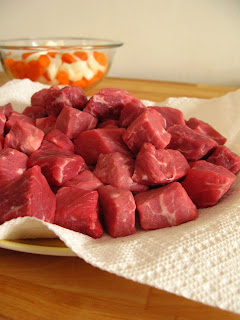
Take your steaks, or whatever cut of meat you start out with, and cut it into even 1" cubes. The definition of braising means that you cook first with dry and then with moist heat, starting by searing over high heat and then finishing with some sort of flavorful liquid. Browning your cubes of beef gives them a nice little caramelization and crust on the outside. And the way to ensure really successful browning is to dry off the cubes of beef first. Seriously! Grab a few paper towels and have them handy so that you don't need to touch the rest of the roll with beefy-hands. I line a plate with a paper towel and then take one cube at a time and give it a gentle squeeze with the paper towel in hand. Just so that the moisture is wicked away.


You have a couple methods for slow-cooking the stew: you could simply simmer on the stove top in a heavy-bottomed pot, or you could put every thing in a dutch oven and put in a low-temperature oven.

Either way, take your pot/dutch oven and place it over medium-high heat on the stove with a couple of teaspoons of olive oil. I recommend turning on the fan/vent if you have one since you will be cooking over high heat. When the pan is good and hot, add about 1/4 of the beef cubes to the pot and give them a little bit of time (20-30 seconds) to sear. Rotate them a couple more times till the majority of the cube has been seared. This doesn't have to be a perfect operation, and remember, you're not actually cooking the beef in this step. Just searing/browning the outside. Transfer the seared cubes to a plate or bowl close by. Add in the next batch of cubes and repeat the process. You'll notice that with the high heat it may start to look like the contents of the bottom of the pot (olive oil, fat from the beef, bits of beef) are getting really dark brown. This is alright (as long as nothing is actually burning black). You'll be sort of "de-glazing" the pot later on and all of these caramelized elements will add tons of flavor to the stew. Keep going until all of the beef is browned. Add in a little more oil as needed, a couple teaspoons at a time.


Keep the pot over medium high heat, add another teaspoon of olive oil, and put in your onions and carrots. You'll see that these veggies with their high water content will right away begin to release a lot of moisture, and this moisture is what will essentially de-glaze your pan and loosen up the caramelized bits from the bottom of the pot. Saute them for about 5 minutes.


Once the onions and carrots have begun to soften, put the cubes of beef back in the pot along with any juices that have accumulated. With the heat still high, sprinkle in 2-3 tablespoons of flour. Gently toss and stir until everything has an even coating of flour. Keep stirring for about 1 minute. This process helps get rid of the flavor of the uncooked flour; you want the thickening aspect of the flour, not its flavor, in the final dish. Now, add in your 12 ounces of beer and enough chicken stock so that everything is almost just submerged in liquid. Stir gently, but right away and keep stirring until the flour is dissolved in and has thickened the liquid. Add in the tomato paste and dried thyme and bring everything up to a boil.

At this point, you can keep your pot on the stove, bring down to a low simmer, and just cook away with the lid on. I used my Le Creuset dutch oven and put it into a 325 degree oven (as per Julia's boeuf bourguignon recipe). You will want to check on it periodically to make sure it's simmering slowly. Everyone's oven will cook a little differently; I ended up turning my oven down to 310 degrees to achieve the right level of simmer.

Ideally you will want to cook slowly for at least two hours. The longer you can let it cook, the better it will get. I let the stew go for about 4 hours and by the time it was done the stew was rich and velvety in consistency and the pieces of beef were so tender they fell to pieces the moment you took your first bite.

However long you let it stew for, the last couple steps are to briefly sautee the mushrooms and add the peas. These two ingredients are a little more delicate and I wanted them to retain a bit if their freshness, which is why I added them to the stew about one hour before we were ready to eat.

In a skillet, melt 1 tbs butter over medium heat. Add your mushrooms and stir frequently. The mushrooms will soak up the butter almost immediately. Keep cooking and stirring until you see the mushrooms just begin to release moisture. Then add them to the pot/dutch oven along with a cup of garden peas, fresh or frozen. Add salt and fresh ground pepper to taste. Stir to incorporate and then put the lid back on and let your stew continue to simmer for about one more hour.

Like I mentioned above, I served the stew over a small portion of lightly buttered egg noodles but it's amazing on its own as well. I paired it with Saison Dupont, a Belgian farmhouse ale.


Tuesday, February 5, 2013

Wine Braised Whole Chicken with Green Olives and Raisins


It may be silly, but I'm especially happy to be writing about this recipe. It's a special one because it comes from the mind of my darlin' A. We are equally passionate about the making and consuming of really kick-ass food, but we have different energies in the kitchen. My days in Organic Chemistry lab often come back to haunt me when I'm in the kitchen as I stoop down to eye the meniscus of the liquid in a measuring cup or search out complex, multi step recipes that bring to mind the four-hour stretches I used to spend synthesizing organic compounds. A, on the other hand, is a consummate artist and I never cease to be amazed by his creativity in the kitchen. He has the ability to lay out an assortment of ingredients and, by his own dear alchemy, transform them into something amazing.

I'm often happy to hand the reins over to him and be his sous-chef, especially when it comes to a dish involving meat. After 12 years as a vegetarian, I'm still learning some of the finer points of applying heat to fish, fowl, and beast. One thing that we cook well, and often, is a braised chicken in a garlic, white wine, and rosemary sauce. This recipe is a spin-off on that general concept.

One evening, we had walked over to our local grocery store and walked back with a small chicken with the intention of popping it in the oven, whole, and roasting it. It was pretty apparent though, when we got home, that A had entered mad genius mode. He broke the chicken down into its major components; breasts, thighs, legs, wings. He had me pit and chop green olives. He poked his head into our baking/cooking cabinet (usually my domain) asking me if we had any dried fruit. I offered dried blueberries and raisins. He grabbed the raisins. He poured in some red wine from an open bottle. About an hour later, we had a dish so delicious, I felt like I was on re-play, saying over and over again how good it all was.

So good that when I requested that we make it tonight, I made sure to document the action and share it here.


Wine Braised Whole Chicken with Green Olives and Raisins

One whole chicken, about 3.25 to 3.5 pounds

2 tbs olive oil

3 cloves of garlic, peeled and lightly smashed

15-20 green olives, pitted and roughly chopped

1.5 cups raisins

About 2 cups of a dry and light-bodied red wine.

About 1/4 to 1/2 tsp dry thyme

2 tbs butter

salt and pepper to taste.


*** Note on the chicken: If the thought of working with a whole bird worries you, go ahead and buy a package of thighs or breasts or even drumsticks. Just make sure that it still has the skin on, as it's a vital part of the dish. I'm an ardent believer in using a whole chicken for the right recipe. A makes a really, really, good chicken noodle soup, starting with popping the whole chicken in a pot to make home-made chicken stock. But again, this is coming from the girl who has much less experience in breaking down a whole chicken. If you use a whole bird, just make sure you look inside the cavity to discard any innards before moving ahead.

***Note on pitting whole olives: Use a knife with a large, wide blade and carefully (with the sharp edge away from you) use the flat of the blade and press it on an olive. This usually opens the olive just enough so that the pit can be easily picked out from the meat.

If using a whole chicken, use a sharp butcher knife or kitchen scissors to separate the thighs and wings. Use the knife to cut down the breast bone so that you have the two breasts.

In a large, heavy bottom skillet with a lid (we use our 3-quart All-Clad skillet), heat the olive oil over medium-high heat. Get the pan nice and hot, so that the oil shimmers when you tilt it in the pan. Lay your pieces of chicken in the pan, skin-side-down and let them brown over the heat for about 5 minutes until the skin is lovely and golden. During this time, toss in the whole cloves of garlic and let them get hot and impart their flavor to the dish. After about 5 minutes, turn the chicken over and add the olives and raisins. Shake the skillet (or use tongs/other utensil) to nestle the raisins and olives down in between the pieces of chicken so that they can contact the hot surface of the skillet. Add your dried thyme. Lower the heat to medium and cook for about 5 minutes.


Next, add your red wine. 2 cups is an approximate. You want to add enough wine so that the chicken is submerged about half-way. You want to leave the top of the chicken with its browned skin above the liquid or the skin will get soggy. Bring the wine to a simmer, cover the skillet, turn the heat down, and continue to cook at a simmer for 35 minutes. Check on it periodically.

Heat your oven to 400F and line a baking sheet with foil.


After your 35 minutes have passed, take the chicken out of the sauce and place it on the baking sheet. Put it in the oven for about 5 minutes just to crisp up the skin a bit more without drying it out. There will likely be some fat from the chicken on the surface of the sauce, which I would recommend skimming off as much as you can with a spoon. Turn the heat on your skillet back up to medium-high or even high. Reduce the liquid in the pan by about 1/3 and then stir in the butter to emulsify the sauce. Add salt and pepper to taste.

Serve the chicken with a generous spoonful of sauce over the top.

The final dish; served with al dente brocoli drizzled with garlic-lemon butter.


Tuesday, January 22, 2013

Roasted Delicata Squash Salad with Warm Pancetta Vinaigrette.


The lovely delicata squash...where have you been all my life? You've been aptly named; next to your larger, more ungainly cousins (the spaghetti squashes, butternut squashes) your petite size and yellow rind with striations of deep green and fiery orange make you a hard little squash to resist. The delicata squash is a friendly squash to work with too. It has a very thin rind that, when roasted/cooked, can be eaten along with the flesh of the squash. Less prep work is always a bonus. I would even venture to say that of all the squash varieties I've tried, this has been one of the sweetest, creamiest, and most flavorful ones I've encountered.

This is a recipe that I've been sitting on for a little while now. Back in the thick of December school and concerts, A and I visited one of our favorite neighborhood haunts, Vesta: Simple and satisfying Italian with a focus on local and sustainable ingredients. This recipe is my adaptation of the original dish we ate since with each bite I focused all of my senses to try and parse out what the dish's components were. Tender, creamy, sweet rounds of delicata squash. A salty, tangy, bacon-y vinaigrette made with pancetta. Leaves of frisée and radicchio whose bitterness is the perfect contrast to the richness of the squash and vinaigrette. Pomegranate seeds that (both visually and in eating) provide a pop of color and sweetness. I was especially happy to find this dish since I knew it would be a perfect (and dairy and gluten free!) addition to the upcoming holiday meals which my sister would appreciate.

This dish has now had two highly successful runs. The first was a meal with friends where we gathered to "celebrate" the end of the Mayan calendar and perhaps the world??? We figured that if the world were to end, we might as well go out with bellies full of tasty food. This salad was in good company with a couple roast ducks, roasted veggies, and an herbed sweet potato gratin.

The second was during Christmas, and this year I was overwhelmed with love/happiness/good feelings to spend the holiday with my family and A's family all gathered under one roof. And yes, my sister loved the salad. Left-over salad was consumed over the next few days, even with turkey and between two slices of bread; a twist on the post-holiday turkey sandwich.

The trickiest part of making this dish may be simply finding the squash itself. Even in NYC I had a hard time. I ended up finding them at the Italian wonderland Eataly (which was handy cause I was able to buy a beautiful slab of pancetta while I was there!). Finding delicata squash may mean a pilgrimage to a high-end grocery store with a vast selection of produce. If you're unable to find delicata, you could probably substitute a butternut, kabocha, or sweet dumpling but all of these varieties will need peeling and a bit more work.


Roasted Delicata Squash Salad with Warm Pancetta Vinaigrette.

2 delicata squash (about 1-2 pounds each)

1 small head of radicchio

2-3 bunches of frisée

1 pomegranate


For the Vinaigrette:

1/4 pound pancetta, small dice

2 tablespoons minced shallots
 
1/4 cup red wine vinegar

1 tablespoon dry white wine
2 tablespoons maple syrup, Grade A preferable
 
1 to 2 tablespoons fresh lemon juice
 
***Note on the Pancetta: If you buy pancetta in a slab like I did, it might still have a layer of skin on it. You'll want to remove with a paring knife, being careful to not lose too much meat/fat in the process. Also, I found that pancetta with a ratio of 1/3 lean meat to 2/3 fat gives the best results. You can just eyeball the pancetta. The fat is the white and the red is the lean meat. Too fatty, and you will not end up with enough of the lovely, crispy bits of meat. Too lean and you may not render enough fat to get the right proportion of fat to vinegar for the vinaigrette.


Preheat your oven to 400F

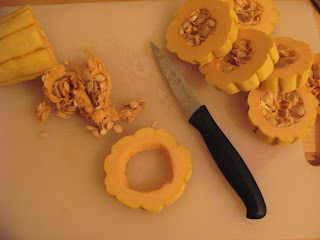
Start by preparing your delicata squash. I found that as far as final presentation is concerned, you want to end up with whole rings of squash. This means you do not want to make a long, horizontal cut along the squash. Instead, working with a sharp knife, cut a small slice (no more than 1/2") off of either end to end up with a clean cut and to get rid of the stem. Next, move along the squash cutting rings of squash that are each about 3/4" wide. Remember that you do not need to peel the squash!


When you have your rings of squash, take a small paring knife and move along the inside of the ring cutting just enough to remove the strings and seeds. Lightly greese a cookie sheet with olive oil and lay the rings in a single layer to ensure that you get even caramelization on each ring. Bake the squash for 30 to 45 minutes until tender when pierced with a fork. After about 10-15 minutes, check on your squash to see if the first side has begun to get a nice golden brown color to it. If so, give all of the rings a flip with a spatula to get some color on the other side. Keep an eye on your squash. Depending on the size of your oven, your rings may brown more slowly or more quickly and you definitely don't want to end up with squash that is burnt on the outside and undercooked in the center.


While the squash is roasting, begin prepping the rest of the salad components.

Here's a great method for getting the seeds out of the pomegranate without making a huge, gory mess: fill a large bowl with water. Cut your pomegranate into quarters and submerge in the water. Get in there with both hands (always fun!) and separate the seeds from the outer rind and the inner, white membrane. This method works so well because the heavy seeds will sink to the bottom of the bowl and the membrane will float to the surface where you can skim it away. Now, you can scoop up all of the seeds from the bottom of the mixing bowl and put them in a smaller bowl or on a plate that has been lined with a paper towel to let them dry.


Take the head of radicchio and remove a couple of the outermost leaves. Cut the head of radicchio in half and then proceed to cut into medium sized ribbons. Frisée is usually sold as a small bunch of slender, curly leaves that are joined at the base. Give the bunch a rinse under the faucet, a quick dry, and then simply cut at the base to separate the leaves. You want to end up with a ratio of about 2/3 frisée to 1/3 radicchio. Interesting note: both of these leafy vegetables are related. They come from the Chicory family.

When you have about 10 minutes left on your roasting squash, begin to make the pancetta vinaigrette. Put a dry skillet over medium-high heat and let it get nice and hot. You don't need to put any oil or butter in the pan; all of the fat you will need will render out of the pancetta when you cook it. Put the pancetta in the hot pan and cook, stirring frequently, until the fat has rendered out and the lean meat has become brown and crispy. Using a slotted spoon, remove the pancetta and place on a plate lined with a paper towel.

Ideally you will end up with at least 1.5 Tbs of drippings/fat left in the skillet. The slab of pancetta I bought yielded pretty much exactly that. If you do end up with an excess, take out enough of the drippings so that you end up with 1.5 Tbs. Over medium-high heat, sauté the shallots until they are soft and translucent. Add the vinegar and wine and cook for 2 minutes, then add the syrup and cook for 1 minute more. Take the skillet off the heat and add in your lemon juice.

Put your frisée and radicchio in a large mixing bowl and when the vinaigrette is cool enough (but still warm) add to the bowl and using salad tongs (or your hands!) toss the leaves to make sure they are evenly covered.

If you're plating family-style, put a genrous bed of the leaves on a large plate or platter. Next, place a layer of the roasted rings of delicata squash (as artfully as you feel inclined to do so) on top of the frisée and radicchio. Finally, sprinkle the crispy pancetta bits and about 1/2 cup of pomegranate seeds over the whole thing.


If you're plating individually, follow the same steps as above and (for a generous salad course) top with 3 rings of squash.


This salad has to be one of the most festive, most beautiful, and most delicious salads I've ever made or eaten. Please enjoy!

Thursday, January 17, 2013

Acorn Squash Stuffed with Andouille, Mushroom, Bell Pepper, and Fontina


I have to admit, I almost feel a little guilty: I'm on week 4 of 5 of my winter vacation. And while there's a small part of me that feels guilty, the sane majorty of me knows that I should (and have been) enjoy this restorative time before entering the fast and hectic pace of my last semester of grad school and student teaching. I've spent a lot of time with my new hobby (embroidery), making first stage plans for my wedding this summer, catching up on TV series (The Tudors, American Horror Story), yoga and pilates, and cooking. Lots and lots of cooking. There is often a mess to clean up afterward, but spending this time in the kitchen creating beautiful food is a very restorative practice indeed.

This post will be one of two that follows a theme, that of seasonal winter squashes. I started out the season with Butternut Squash and Cashew Creme Pasta with Shimeji Mushrooms. The dinner I made tonight focused on acorn squash. I like acorn squash for its compact size. It's easily cut in half, cleaned, and makes a nearly perfect and hearty meal for one person.

My game plan for this dish was to take something tasty and stuff it with other tasty things and bake it for a while. Can't go wrong with that.


Acorn Squash Stuffed with Andouille, Mushroom, Bell Pepper, and Fontina

Serves 2-4 people (depending how hungry those people are)


2 small-to-medium acorn squash

1tbs olive oil

3 shallots, cut into thin slices

1 red bell pepper, cut into 1" slices

8oz container of cremini mushrooms, each cut into 4 vertical slices

1/4 cup red wine

1 tbs dijon mustard

1 tbs dry rubbed Dalmatian sage

fresh ground pepper

kosher or sea salt

2 Andouille Sausages, if pre-cooked simply cut into 1/4" slices

1 cup grated fontina cheese


Preheat oven to 375F

Like I mentioned above, an acorn squash is easier to work with than, say, a large butternut squash. But still, be careful when cutting each squash (the rind is still quite hard). Start by finding the point at the bottom of the squash and cut a very small horizontal slice off of the bottom, just enough so that this half of the squash will rest flat without wobbling. Then cut the whole squash in half, horizontally, and scoop out the seeds and strings.

In a large skillet over medium-low heat, put in the olive oil and shallots and sweat the shallots until they soften for about 4-5 minutes. Bring the heat up to medium-high and add the bell pepper. In a small bowl mix the wine and mustard and then pour over the contents of the skillet. Cook for 2-3 minutes before adding the mushrooms. Add the sage, salt and pepper (to taste), and cook for 2 minutes. Add the sausage and cook for another 3 minutes or so.

Lightly grease a cookie sheet with olive oil and put your acorn squash on the sheet, cut-side up so that each forms a bowl. Generously fill each bowl with the filling before topping each half with 1/4 cup of the fontina cheese.

Bake the squash for 45-50 minues until the squash is tender when pierced with a fork and the cheese is bubbly and golden.

When the squash is done and out of the oven, it doesn't hurt to let these hot bowls of deliciousness cool off for about 5 minutes before digging in.


We ate these pretties with a salad of mesclun greens with a white balsamic/white miso vinaigrette and a glass of Côtes du Rhône (the same wine used in cooking the filling). Oh so good.

Saturday, December 22, 2012

Garbanzo and Chorizo Stew/Cocido de garbanzos y chorizo


It's impossible for me to remember the first time I had this earthy and comforting stew. It might have been when I was living in South America, it could have been the time one of my mom's co-workers from her elementary school gave her a home-cooked batch. All I know is I loved it instantly. I've always been a sucker for garbanzo beans, whether in hummus form or, more often than not, straight out of an opened can that's destined for some other recipe. But in the busy ebb and flow of the river that is food options in New York City, this was a dish I hadn't thought about in a while. Until...

Like a bolt out of the blue it struck me; in the middle of my day of student teaching, grading some students' final projects, I had a craving for this hearty and smoky Spanish stew of garbanzo beans and chorizo. In Spain, this kind of stew is known as a cocido or a cazuela.

In my neighborhood of Astoria, I've described the amazing small specialty food stores we have at our fingertips. In my recipe for Butternut Squash and Cashew Creme Pasta, I talked about my love for my favorite produce stand, Eliniki Agora. This recipe gave me a chance to visit some other amazing stores close by for the ingredients.

I first stopped by International Meat Market, where I promptly made friends with a butcher from Argentina who guessed I was from Spain judging from my Spanish accent. We discovered that both of us were actually travellers who had lived all over the world and decided that this is definitely an ingredient in the recipe for a better world. They sold me the Spanish style chorizo that was destined for the stew/cocido. I grew up with Mexican style chorizo, which is a fresh pork sausage colored, flavored, and spiced with chili powder that needs to be cooked before eating and makes for a perfect Saturday morning breakfast with eggs and tortillas. Spanish style chorizo, on the other hand, is a hard cured sausage, often smoked and flavored/colored with paprika. I've included it in many recipes, but a good quality chorizo is awesome cut into slices and enjoyed as is.

International Meat Market was out of jamón serrano, so I took the recipe's advice to substitute another cured pork incarnation: prosciutto. I walked a couple blocks to Dave & Tony's Salumeria and was greeted (as I am every time) by the strong and heady scent of cured salami that hang from the ceiling and the mozzarella and fresh pasta that fill the refrigerators. The conversations in Italian stopped so that Dave (or Tony) could cut me a nice thick slice of prosciutto. Since it was destined to be a garnish, I did not want the paper thin slices that the super market would have had.

Lastly, I thought that because this was a Spanish cocido, I needed a nice Tempranillo wine to go with it. The last stop was our favorite wine shop, where the knowledgeable owner (who happens to be from Brazil) helped me pick out a dry Tempranillo that was a little lighter than some of its fellow Tempranillos. Light and dry, just how we like'em.


Garbanzo and Chorizo Stew/Cocido de garbanzos y chorizo
based on a Jamie Oliver recipe

Makes 4 generous servings.


2-3 tbs extra virgin olive oil

1/3 lb Spanish chorizo, finely chopped (1/2'' pieces)

1/2 yellow onion, peeled and finely chopped

1 large clove garlic, minced

2 ribs of celery, finely chopped

about 200g/8oz fresh spinach

8 fresh Roma tomatoes, deseeded and roughly chopped

15.5oz can of good quality garbanzo beans/chickpeas

32oz of chicken stock

fresh ground black pepper

salt, if needed


*Prep notes: My favorite way to deseed a tomato is to simply cut it in half and take a large soup spoon and scoop out all of the seeds and the inner membrane. If you feel ambitious, you shoud save these tomato innards and use them when making a vegetable stock; I keep a ziplock bag in the freezer with bits and ends and shavings of various veggies for this very purpose. To do a quick and fine chop of the celery, take a knife and slice each rib evenly down the middle. Then, line up the ribs, keeping them in place with one hand and make your even slices with the other.


Put a large pot over a medium high flame and heat a couple tablespoons of olive oil; I was glad for the opportunity to use the hefty All-Clad stock pot. Add the chorizo and cook for a few minutes until the fat renders out of the chorizo and it starts to look a little bit crispy on the edges. Next, add the onion, garlic, and celery. Give everything a good stir, cover the pot with the lid, turn the heat way down (medium-low to low) and cook covered and slowly for 15 minutes. After those 15 minutes have passed, take the lid off and turn the heat back up to medium high for a couple minutes. Add the spinach, tomatoes, garbanzo beans and chicken stock. Bring to a boil and then lower the heat and simmer for about 40 minutes.

Soup simmering with eggs boiling.

After the 40 minutes have gone by, take about a third of the soup out and put it into a food processor or a large bowl (if you will be using a stick blender). Puree until you have a very smooth mixture and then add it back to the rest of the soup in the pot. Make sure you taste at this point before seasoning with some fresh ground black pepper and maybe some sea salt or kosher salt. Remember that the chorizo and the jamón/prosciutto will be salty on their own, so be careful not to over salt the stew.


In my mind, the soup is amazing on its own but it's made that much more special by a garnish of some medium diced jamón serrano/ prosciutto and (get this) some grated hard-boiled egg. I'm of the opinion that the humble egg makes any dish even better, and apparently this is how they serve it in Barcelona. I'm all for it.

Cocido de garbanzos y chorizo with prosciutto and grated egg.


Sunday, December 2, 2012

Savory, Crispy, "Cheesy" Kale Chips


Kale chips; where to start? From a healthy eating perspective, they take kale (high in fiber, iron, vitamin k, a, and c, antioxidants like carotenoids and flavonoids, and calcium) and add even more flavor with a coating of savory vegan ingredients. From a snacking standpoint, they're addictive! I think of them as earthy cheeze-its; perfect for when you are craving a cheesy, crunchy, and salty snack.

I really only discovered kale chips about a year ago, spending a summer afternoon at "The Treehouse" home to A.'s aunt and uncle. Aunt J. is an amazing cook who always inspires me with her knowledge of good food that runs the gamut of local meat and veggies to raw and vegan cooking. Add to that my sister who has begun eating dairy and gluten-free, and I suddenly have new ingredients and cooking techniques on my radar. Kale chips (and all that goes into making them) are just one example.

There are a couple independent, organic, health food stores in my neighborhood where I could reliably find kale chips in a variety of different flavors and brands. One thing that they all had in common was their high price for a relatively small tub. Let's be honest, I could demolish an entire tub of kale chips in one sitting.  I got this recipe from Aunt J. earlier this year and was excited to try making them. I had to wait for the arrival of colder weather since (lacking a dehydrator or dehydrate setting on my oven) I would need to bake the chips at a super low temperature for 8 hours or so.
So one appropriately chilly afternoon sometime in October, I tackled making my very own kale chips. And in case anyone was wondering, this recipe is golden! It makes kale chips every bit as delicious as what you would buy in a store. They might even be more delicious just knowing that you made them with your own two hands and saved some $ in the process.


***Note: like many vegan recipes, this recipe requires you to soak raw cashews overnight. Keep this in mind as part of your prepwork when making the chips.

***Note:I was feeling a teeny bit lazy, and so I went with a bag of pre-washed and cut kale leaves. This definitely took a lot of prepwork out of the whole process. If you can't find a bag of pre-washed and cut kale leaves, or if you prefer to buy them in their whole-leaf state, you will need to get rid of the incredibly tough stem by picking the leafy portion off. There have been a couple times when I was eating store-bought kale chips and found that a bit of stem made its way in. It's like trying to eat a twig of wood, and probably another good reason just to make your own.


Savory, Crispy, "Cheesy" Kale Chips
(from The Treehouse Diary)

One 64oz bag of kale (or the equivalent thereof in bunches of whole leaves)

1 cup of raw and unsalted cashews, soaked at least 8 hours or preferably overnight

2 tbs of nutritional yeast (also known as brewer's yeast, easy enough to find in most health food stores)

1/4 tsp kosher or sea salt

2-3 tbs of fresh lemon juice

1/4 cup of red bell pepper, medium dice
 

Even though my bag of kale leaves was mostly ready to go, I still went through the whole thing to make sure that no stems were sneaking in. The few offenders I found (see the picture below) were promptly disposed of. I put the kale leaves in the largest mixing bowl I own and set aside.


Preparing the "cheese" mixture can easily be done in a blender or a food processor. Since my food processor is pretty ancient, I've found that a good high-powered stick blender works just fine. Simply combine all of the ingredients (minus the kale) in your blender/processor/bowl and blend until you have a smooth paste. You can add a little water if it's too thick; optimally, you should end up with a mixture about the thickness or consistency of yogurt (not the greek kind).

When the mixture is ready, pour over your kale and really get in there with both hands, mixing the ingredients until the kale is evenly coated and even a little wilted.

Take two cookie sheets and line them with parchment paper or a very light coating of olive oil. This will help prevent your kale chips from sticking on the sheet and crumbling when you try to remove them. Spread your kale chips in an even layer on each cookie sheet and try not to over-fill each cookie sheet. If the chips are all on top of each other, they won't crisp up as effectively.

I went with the low-heat oven method set to 175F for about 8 hours. I checked on them periodically to test them for crispiness. If your oven has a dehydrate setting, dehydrate for about 12-24 hours until they are the right consistency. I stored my kale chips in a tupperware container and even tossed in one of those food-grade moisture absorbing packs from a bottle of vitamins. They stayed nice and crispy for a week or so, until I ate them all.


Like I mentioned, these chips are delicious. There are also many ways you could play with this recipe. You could add a clove or two of minced garlic to the "cheese" mixture, or even a bit of cayenne pepper if you wanted a kick. Any way you make'em, you'll have a tasty and healthy snack on your hands and a well-earned sense of accomplishment. Now go do a happy dance while you eat your kale chips.